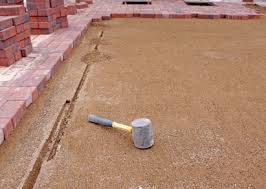
How to Lay Paving stones for a Patio
HOW TO LAY PAVING STONES FOR A PATIO
“How to lay paving stones for a patio”, Do you look out at your back garden and wish that you had somewhere for the family to relax and enjoy those summer days that are just round the corner? Or even a great place to barbeque and have guest for a party? Creating a patio yourself is not difficult and can be completed in a weekend, of course that depends a bit on the size of the area you are going to slab and how much digging out has to be completed before hand.
Step-by-Step Instructions How to Lay Paving for a Patio
Here is the perfect project for the weekend warrior looking to transform that ordinary outdoor space into an extraordinary gathering place for family and friends. Working with patio pavers allows you the opportunity to work on a budget and still design endless size, colour, and shape designs into the area. Here is a list of the items you will need and the step-by-step instructions for installing or for your question how to lay paving stones for a patio.

Materials and Tools Needed
The pavers, gravel, sand and course dirt, string and wood stakes, 2×4 boards of 8 feet, trowels and shovels, a bender board, push-broom, hammer, measuring tape and level, grading rake, and vibrating compactor. Be sure to measure out the area and choose the appropriate amount of pavers. It is a good rule of thumb to buy several dozen extra pavers today, so if one breaks in the future you can do a simple swap and the stones will match perfectly.
Step 1
Take your grading rake and begin to level out the location where the patio will be installed. Try to make the area as level as possible.
Step 2
Take your shovel and begin to spread some gravel evenly in the location. Be sure to cover the entire region while keeping things as level as you can. The grading rake is perfect for levelling the gravel.
Step 3
Put down some dirt and simply repeat the spreading and levelling process as with the gravel.
Step 4
Put down the sand, once again using the grading rake to keep everything as level and uniform as possible. Run the grading rake over the sand one last time to create the perfect base and drainage system for the project. Use a rented vibrating compactor to pack the base, then use one of the 2×4 board to evenly grade excess sand that is not level.
Step 5
Once the 2×4 has levelled the base, run the compactor over the entire area one time. Run the 2×4 one last time for the final grading.
Step 6
Place the 2×4 over the centre of the area and place your level on top. The surface needs to be as close to level as possible. If off, simply keep grading until the desired evenness is achieved.
Step 7
The bender boards and the wooden stakes should be placed around the base to create a solid frame. This ledger frame is going to help to keep the patio pavers in the right position. Use the tape measure to ensure the frame is even or the pavers simply will not line up properly.
Step 8
Now take some string and cut two long enough pieces to be able to stretch across the length of the frame. Place the first string along the outside edge and tie to the stakes. This string will help you align the pavers as you place them, keeping them in a straight line on the outer edge. The second string needs to be low and touching the top of the pavers. This will ensure all the pavers are installed at the exact same height as you go.
Step 9
Begin to place the pavers on the base one at a time. Pay very close attention to the line to make sure they are all lining up correctly. Place the paver straight down and vertically into the sand, if not they will get sand in between the pavers and they will not be seated evenly. If you make a mistake, lift the paver up, use a trowel to level that location, place it again carefully.
Step 10
Continue placing each paver on the pace in a slow and methodical process. If you rush and place a few incorrectly, it will affect all the others being placed after those. Take the time to make sure they are lined up and they are the correct height as you go.
Step 11
Once you have completed the entire patio area, now you can use the compactor again to settle down all the pavers. This will give the entire location a more uniform look.
Step 12
Take off all the bender board, string, and stakes.
Step 13
Throw some of the remaining sand over the top of the pavers. Take your push broom and begin to sweep the sand around, allowing it to fill in any of the openings in between the pavers. This process can be done several time to solidify the position of the paver in place.
Once you are done sweeping, simply place some furniture on your new patio and ENJOY! We hope you enjoyed our post that is how to lay paving stones for a patio. Leslie writes at PlainHelp about all things DIY.


